Gallery
How to series
Correct installation of all windows, doors, and fly screens is critical to ensure they operate as they should—without any headaches—for many years to come.
Installing your fly screen is a simple process; follow this step-by-step guide to ensure correct installation.
Before you begin, make sure you’re wearing the right safety gear for the site you are working on, and the tools you are using.

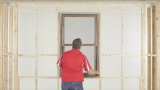
Standing on the outside of the house, measure and mark the jambs 150 millimetres from the top and bottom of the window.
Pre-drill a hole at each of these marks with a 3 millimetre drill bit.
Place the screen onto the window and let it sit on the sill.
While holding the screen in position, hold a screen clip over one of the pre-drilled holes and fix a screw through it using your drill with the Phillips head bit. Repeat this process for each of the holes on the jambs.
To remove the fly screen, rotate all of the clips so that the screen is free to be removed from the frame. If too tight to do so, you may need to loosen or remove the screws.
Want to learn more about A&L’s range of windows and doors? From sliding windows and sashless solutions, to louvres and awnings, our family of products are designed for maximum durability, and to suit every style – from traditional to contemporary.